You have some options for how you want to publish your Flash
file. You can publish your file via the File>Publish Settings area or with
File>Export Movie (for some formats).
To view these options go to the Publish Settings under the File menu. Under
Formats you will see the following options:
Flash
Generator template
HTML
Gif image
Jpeg image
Windows Projector
Mac Projector
Quicktime
Real Player
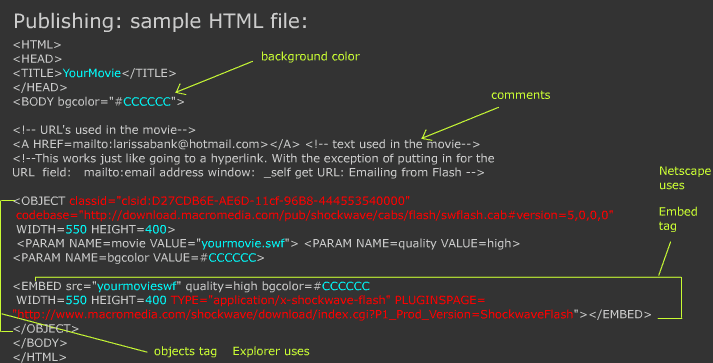
For putting your movie on the web you will want to choose HTML and Flash. You can make your own HTML file to house your Flash movie in another application or by hand, but this is the easiest way to make it with Plug-in detection for Netscape and Internet Explorer.
To convert your movie to a Quicktime file, choose Quicktime. Be sure to pay attention to what scripts will work in Quicktime on export before you publish or your movie will break.
The next most common option is as a Projector for macintosh or PC. These files have the Flash Player embedded inside them and are for sending files to someone not on the internet, like on a CD. This movie will play even if the user doesn't have the Flash Player.
Flash Settings:
Load Order: If the movie will load in top to bottom or bottom to top
Generate size report: gets the size of assets in your movie
Omit Trace Action: eliminates any trace actions you have put in
Protect From Import: THIS IS VERY IMPORTANT. This is how you secure you files
from others taking them.
Debugging Permitted: Allow you to get to debugger from a browser
Password: This makes it so you need to enter a password to use the debugger
JPEG quality: Determines output quality of JPEGs in your movie
Audio: Stream/Event: sets the output quality for audio
Override sound settings: You can set audio quality in the library. If you
want Flash to override these settings and use those above, check this.
Version: What version do you want to publish your movie in?
Publishing your Flash document for the web and incorporating basic HTML coding for your Flash document
Flash HTML Settings:
Dimensions: Match movie, 100% of browser: scales, or specify dimensions.
Flash publish settings related to scaling for use only when specifying exact dimensions or if using percentages otherwise the movie always stays a fixed size in an html page:
So, first set your dimensions to percent to modify these settings below:
Show all: always scales entire movie to fit
window without distorting or cropping
see example
No border: scales movie to fit window without
distorting but will crop content to fit
see example
Exact Fit: scales movie to fit all dimension
so no background color will show: distorts
see example
*No Scale: Keeps the movie at 100% no matter
what the window size is, content will crop if window scales.
see example
Window settings:
Window: uses the movie in its own window in a web page: default
Opaque windowless: make the transparent areas of your movie block out background (for Internet Explorer 4 with Active X on Windows platform only)
Transparent: allows elements to show through
in transparent areas of your movie. You will need to adjust the html page to
change the background color to see the transparency.
see example
download the following sample files to see different publish settings.
swd files...what are they?
Debugging has changed with Flash MX. Flash MX uses SWD files that contain debugging
information which allows more advanced debugging with breakpoints. By enabling
debugging you'll still be able to debug the SWF without the SWD counterpart
but you'll not be able to step through the code or use breakpoints. (Flash MX
will display an error that it cannot open the SWD file).
Template
these are just different preset HTML options. You can also make your own, or
you can import these with the Extension Manager.
(the Extension Manager adds new programmed extensions that are built for Flash,
much like plug-ins in other programs. Adding to the abilities of your Flash
movies).
notes:
Flash detection templates in the HTML settings give alternate gifs...select for
version 7 when publishing for version 7.
